Add, modify or delete data from your customized AI
Your customized AI is not static, and you can make corrections to it. This article covers all the modifications you can make.
1. Where can I find it?
Go to your Chatbot’s“Settings” and select the“Smart AI” tab.

Here you’ll find all your customized AIs, accessible via their title blocks.

The title block tells you the name of the AI, its type and the number of inputs.
It also suggests actions via icons.
These actions are described in detail below.
2. Modify or add data

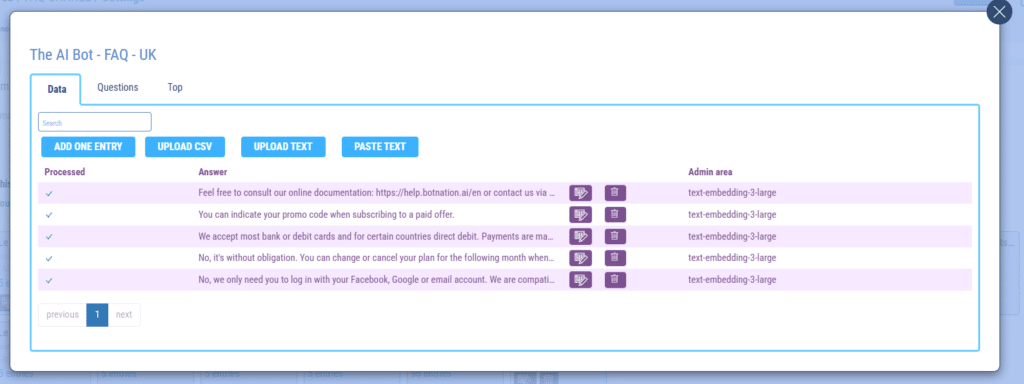
Clicking on this icon takes you to the contents of your personalized AI.
A. Data tab

a. Modifying data
If you wish to modify any data, simply click on the icon and a new window will open with an editor.

You can then make your changes. To validate them, click on the“MODIFY” button.
ATTENTION
Modifying data consumes 1 credit.
b. Delete data
At this point, you can click on thedelete icon, which, after confirmation, will delete the entire data line.

c. Adding data
You have several options for adding data:
- Add entry: lets you enter all the details of a new entry directly in the interface,
- Add a CSV: lets you add several entries at once by adding a CSV file,
- Add TXT file: lets you add several entries at once by adding a TXT file,
- Paste text: allows you to paste text with questions/answers directly into the interface.
Clicking on the “UPLOAD A CSV” button will open your computer’s file explorer, where you can select a CSV file containing the new data.
The file will then open in the interface of the next step.

This is where you match the columns in your CSV file to the type of data to be processed by SMART AI.
To do this, make your choice from the drop-down menu above each column.
ATTENTION
Don’t forget to check which line you want to start treatment from.
The wizard will automatically indicate the number of credits required to process the data.

When you have finished, click on the“ADD” button.
B. Questions tab
Here you’ll find your Personalized AI usage history.
Questions that the chatbot was unable to answer appear here in red. At the end of the line, there’s an “Add” button. It’s handy for adding new answers to your AI.

C. Top tab
This tab ranks the most frequently returned Responses. Ideal for understanding how your users use your AI.

3. Delete a custom AI

When you click on this icon, you have the option of completely deleting the customized AI after confirmation.
Plus:
– Create a chatbot automatically with SMART AI from Botnation
– Add custom AI to your chatbot automatically with SMART AI from Botnation
