Créez votre IA personnalisée en quelques clics à partir de vos données.

Dans cet article, nous allons vous expliquer les étapes qui vous permettront de créer un chatbot automatiquement à partir de vos données en quelques minutes.
Vous allez voir à quel point c’est simple : il vous suffit d’uploader un simple fichier TXT ou CSV et SMART AI de Botnation s’occupe de tout. En quelques clics, votre chatbot répondra à vos utilisateurs avec la puissance de la reconnaissance du langage naturel des IA Génératives sur la base unique de vos données.
1. Par où commencer ?
Sur votre tableau de bord, choisissez sur quel canal vous voulez créer le chatbot (Messenger ou Chatbot-Web) en cliquant sur l’onglet correspondant.

Puis cliquez sur le bouton « CRÉER UN CHATBOT AUTOMATIQUEMENT AVEC SMART AI« .
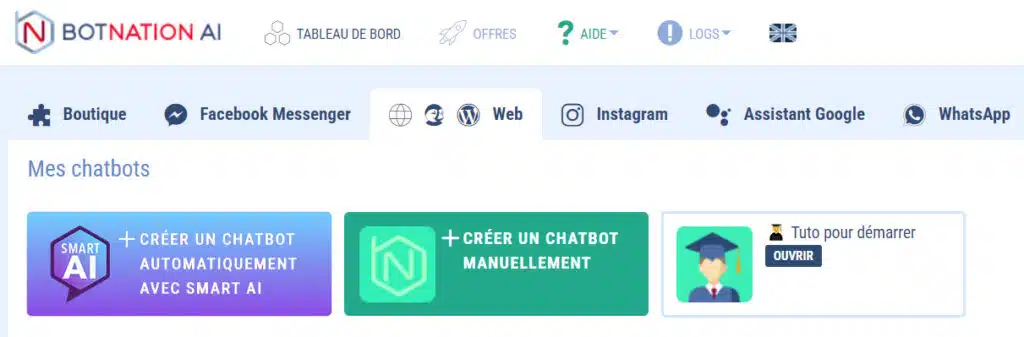
Cela ouvrira l’assistant de création de chatbot SMART AI.
2. L’Assistant de création de chatbot SMART AI
A. Types de chatbot
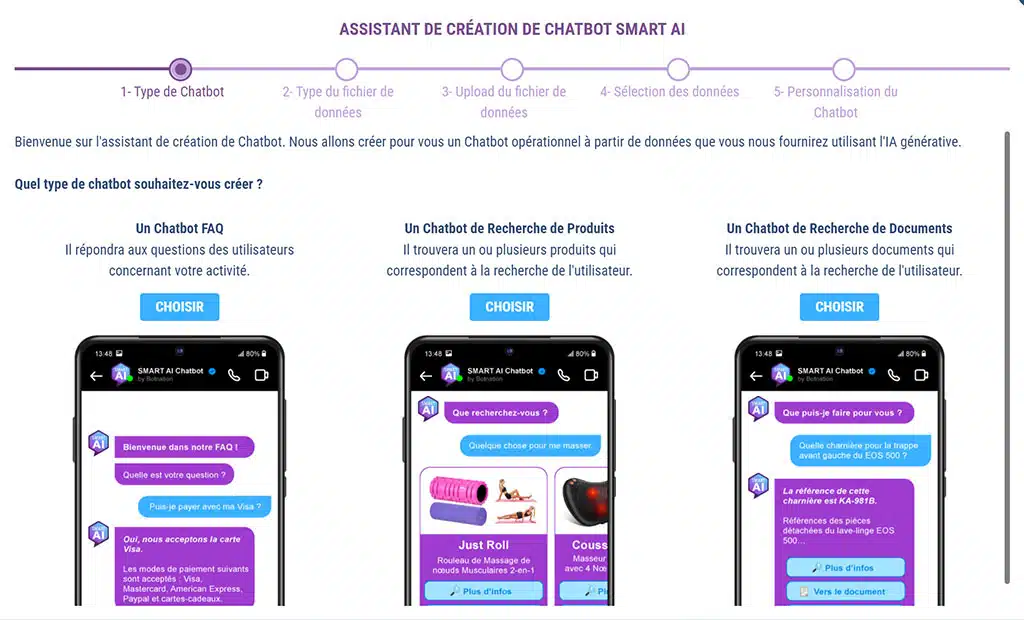
La première étape vous présente ce qu’un chatbot créé par SMART AI peut faire.
Il s’agît ici de choisir ce que le chatbot va faire en fonction de vos données.
Il y a 3 types de chatbot :
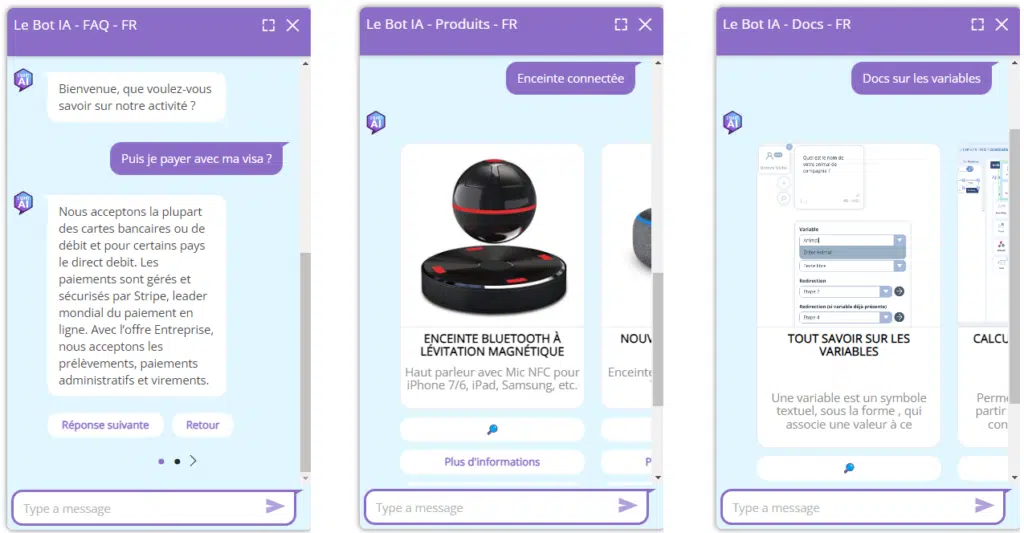
– Chatbot FAQ : Il répond aux questions des utilisateurs concernant votre activité,
– Chatbot de Recherche de Produits : Il trouve un ou plusieurs produits qui correspondent à la recherche de l’utilisateur,
– Chatbot de Recherche de Documents : Il trouve un ou plusieurs documents qui correspondent à la recherche de l’utilisateur.
Faites votre choix, et cliquez sur le bouton « CHOISIR »
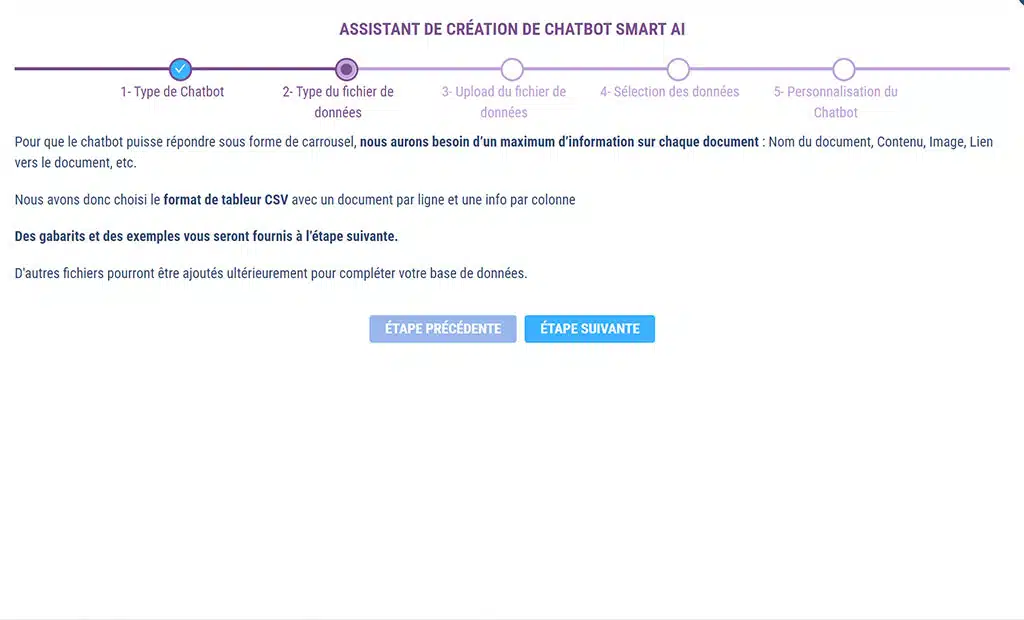
B. Upload du fichier de données
a. Chatbot FAQ
Choix du type de fichier
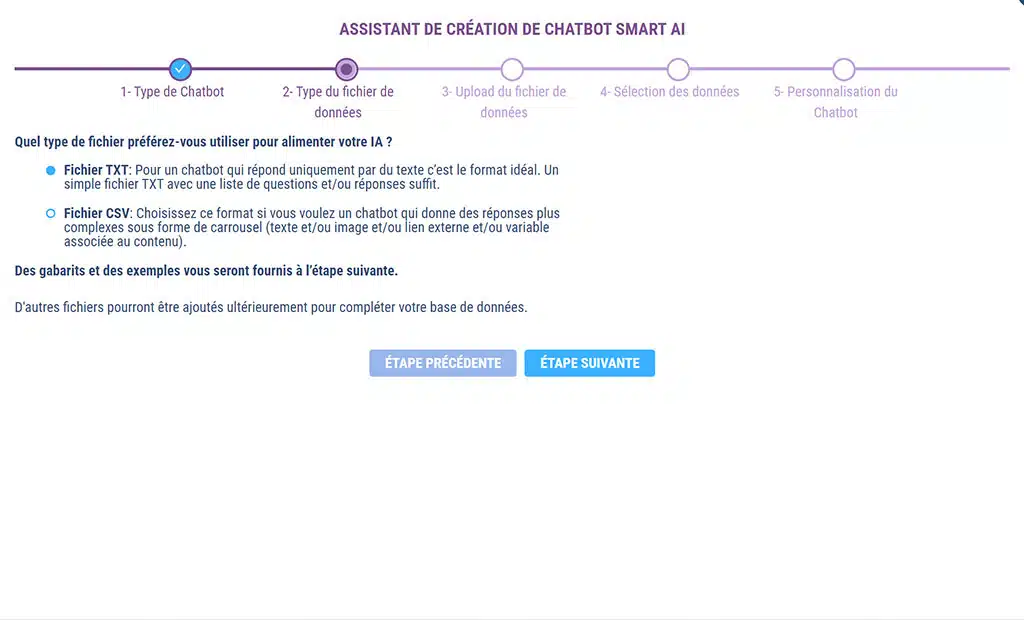
Pour les chatbots FAQ nous proposons 2 types de fichier pour alimenter votre IA personnalisée :
– TXT : le format commun à tous les programmes de traitement de texte,
– CSV : le format commun à tous les tableurs.
Si vous voulez associer une image et/ou un bouton à la réponse du chatbot, choisissez le format CSV.
Faites votre choix, et cliquez sur le bouton « ÉTAPE SUIVANTE »
Fichier TXT
A cette étape vous devez choisir si vous voulez que SMART AI analyse les questions et/ou seulement les réponses.
L’analyse des questions n’est pas nécessaire mais c’est un plus.
Il convient de mettre en forme le fichier TXT pour que SMART AI le comprenne.
Pour une analyse des questions et des réponses : Question / Saut de ligne / Paragraphe de réponse / Saut de ligne X2 / Question suivante / etc.
Pour une analyse des réponses uniquement : Paragraphe de réponse / Saut de ligne X2 / Paragraphe de réponse suivante / Saut de ligne X2 / etc.
N’hésitez pas à télécharger nos exemples de fichier TXT pour vous inspirer.
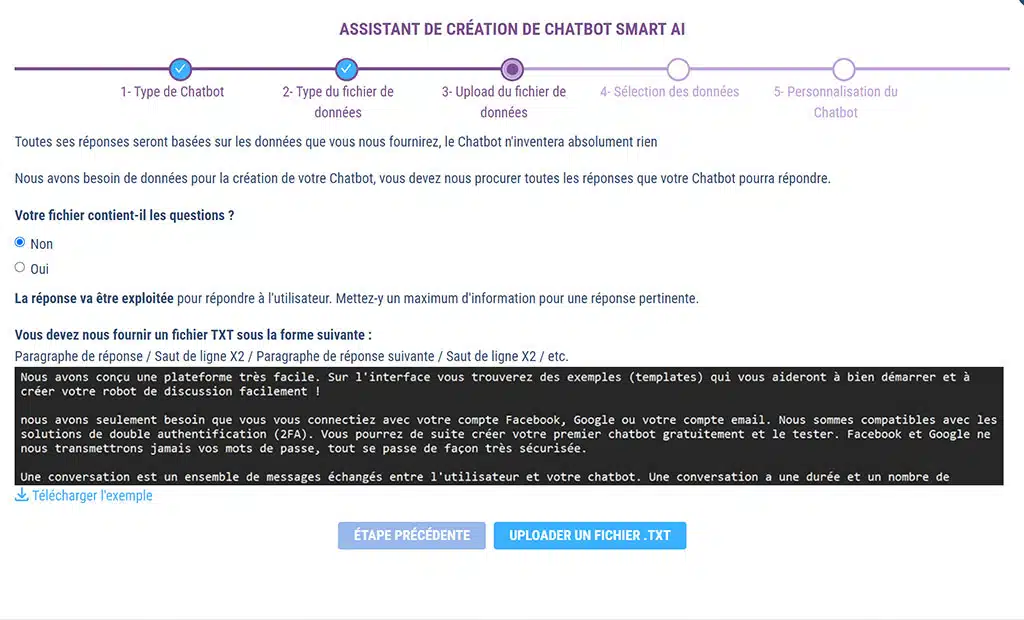
En cliquant sur le bouton « UPLOADER UN FICHIER TXT» vous ouvrirez l’explorateur de fichier de votre ordinateur et vous pourrez y choisir votre fichier.
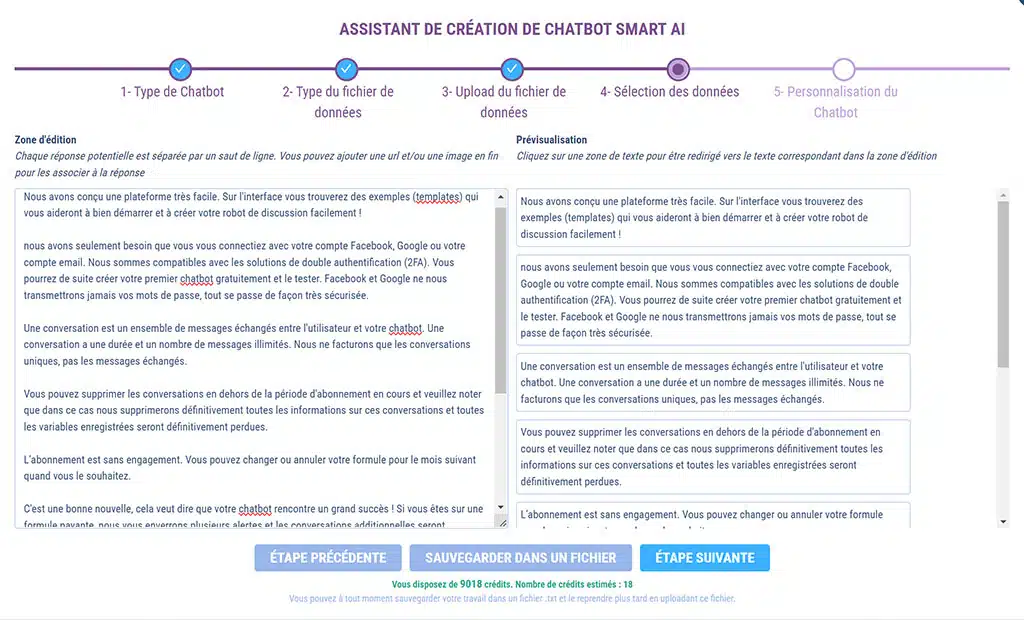
Le fichier s’ouvrira alors dans l’interface de l’étape suivante avec à gauche votre fichier et à droite la segmentation que SMART AI a compris.
Ci dessous l’interface si on a choisi l’option Réponses uniquement.
Ci dessous l’interface si on a choisi l’option Questions et Réponses.
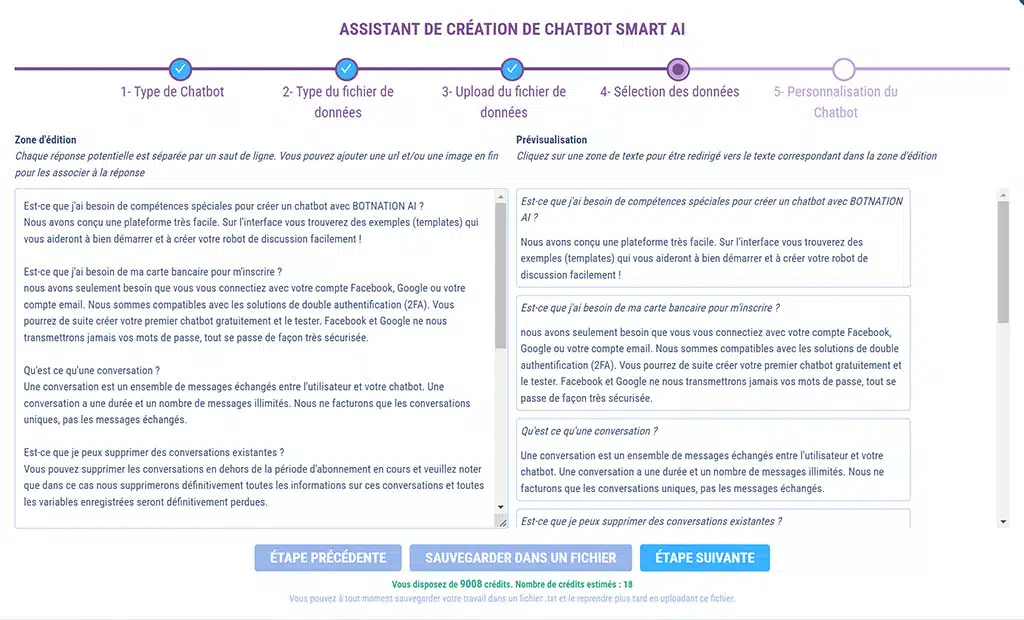
Cliquez sur « ÉTAPE SUIVANTE » pour valider votre fichier.
Fichier CSV
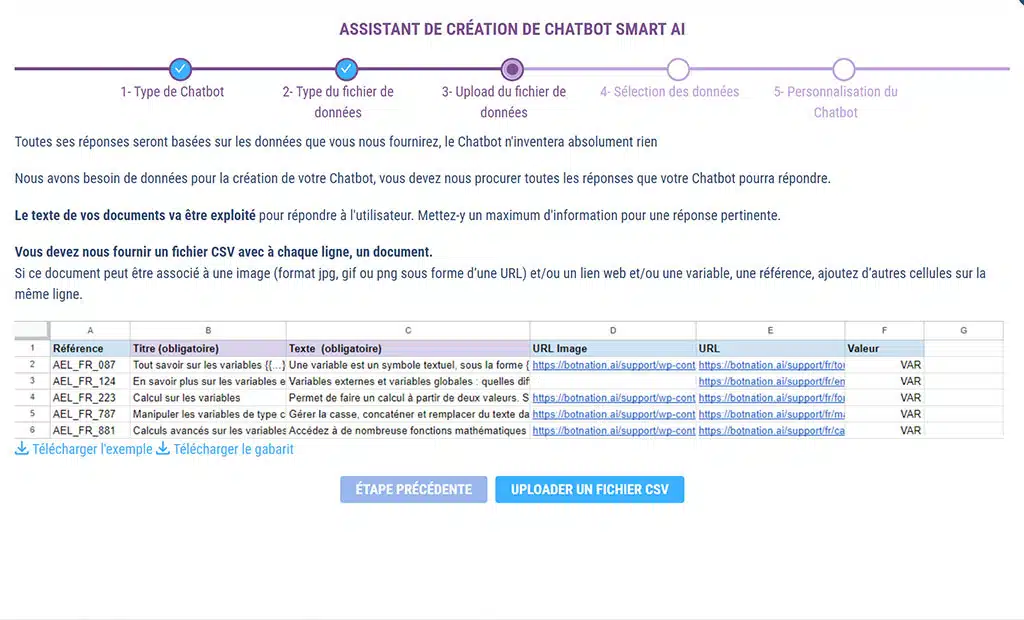
Il convient de mettre en forme le fichier CSV pour que SMART AI le comprenne.
Nous vous conseillons donc de télécharger notre exemple de fichier CSV et notre gabarit pour vous aider.
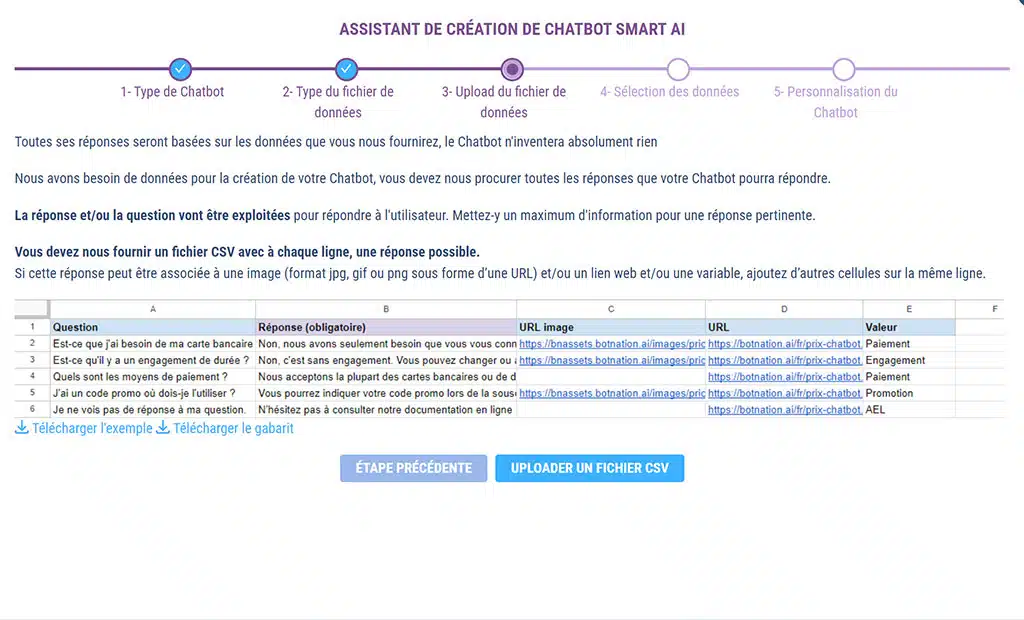
En cliquant sur le bouton « UPLOADER UN FICHIER CSV» vous ouvrirez l’explorateur de fichier de votre ordinateur et vous pourrez y choisir votre fichier.
Le fichier s’ouvrira alors dans l’interface de l’étape suivante.
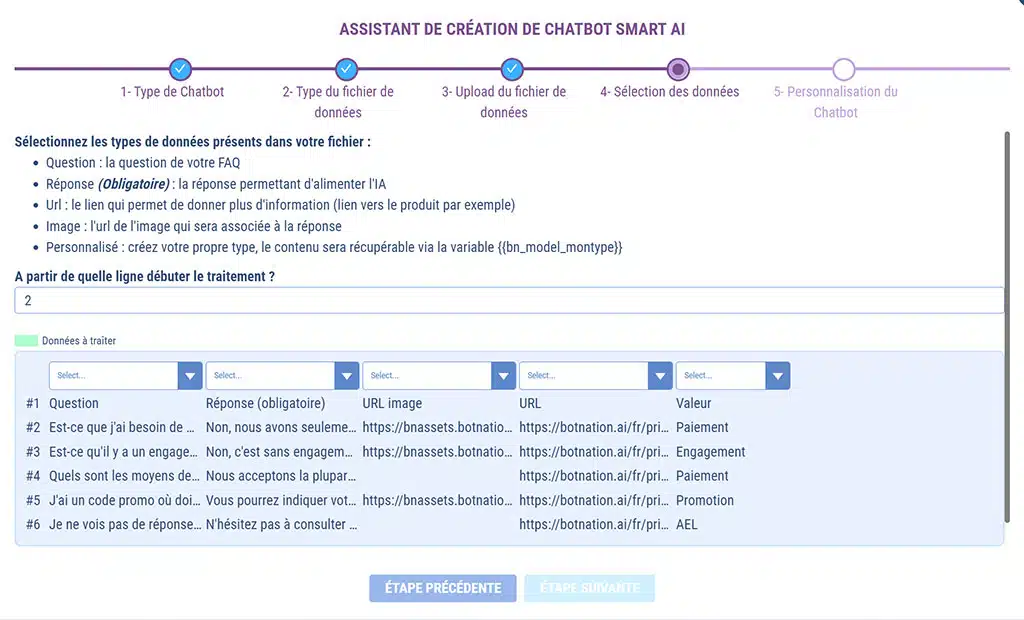
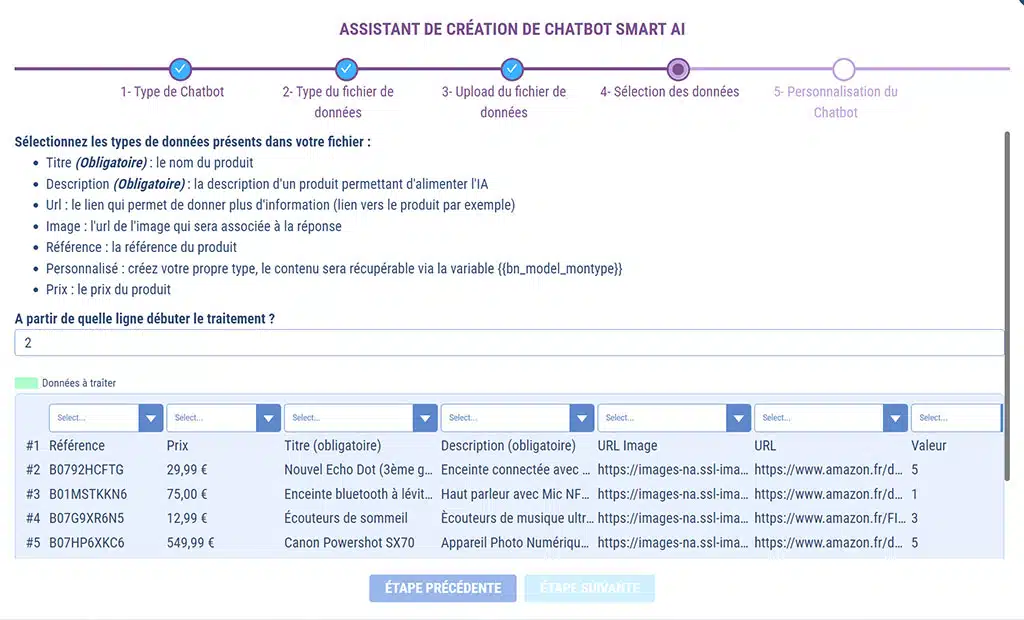
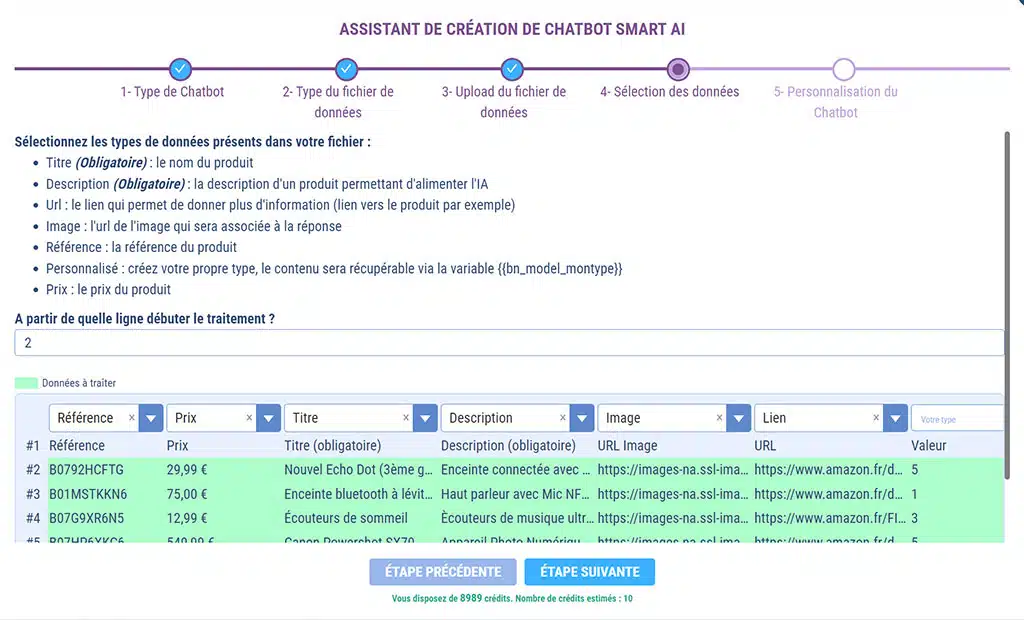
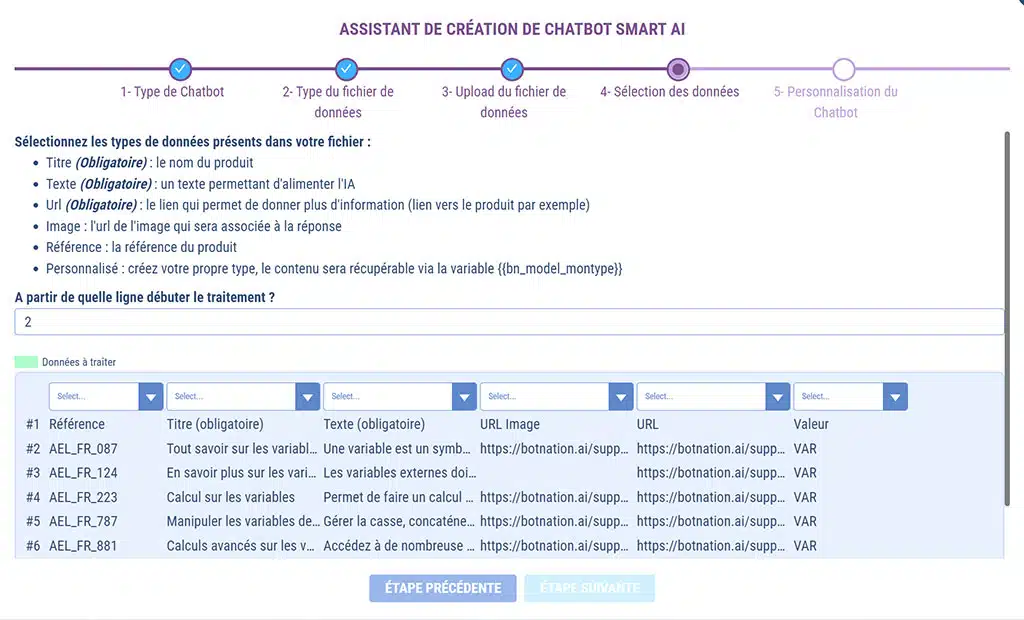
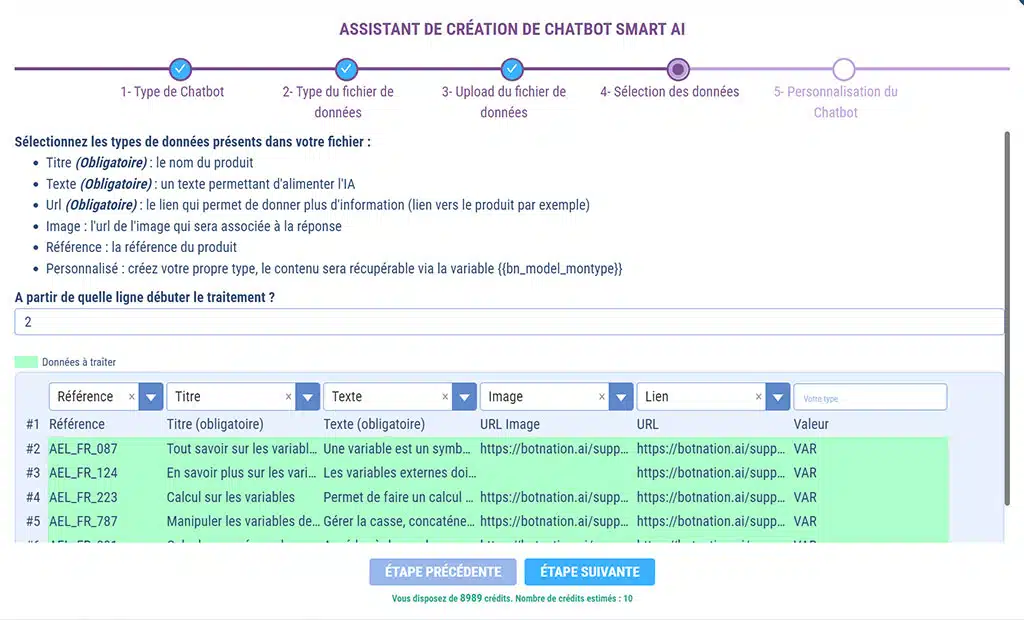
C’est à cette étape que vous allez faire correspondre les colonnes de votre fichier CSV au type de données que doit traiter SMART AI.
Pour ce faire vous faite votre choix dans le menu déroulant au dessus de chaque colonne.
ATTENTION
N’oubliez pas de vérifier d’indiquer à partir de quelle ligne le traitement doit débuter.
L’assistant vous indiquera automatiquement le nombre de crédits nécessaires au traitement des données.
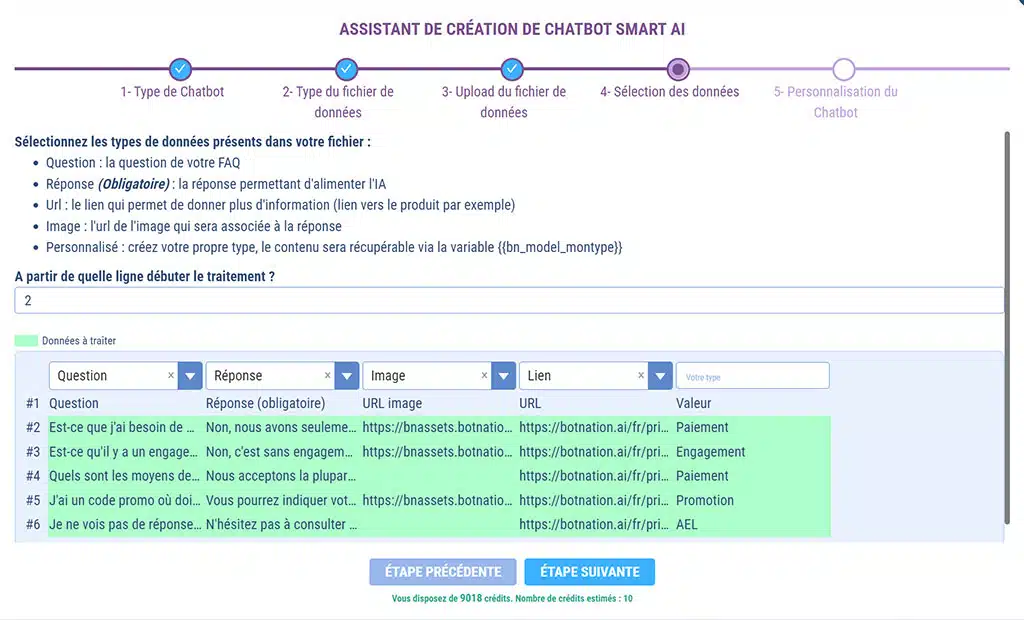
Cliquez sur « ÉTAPE SUIVANTE » pour valider votre fichier.
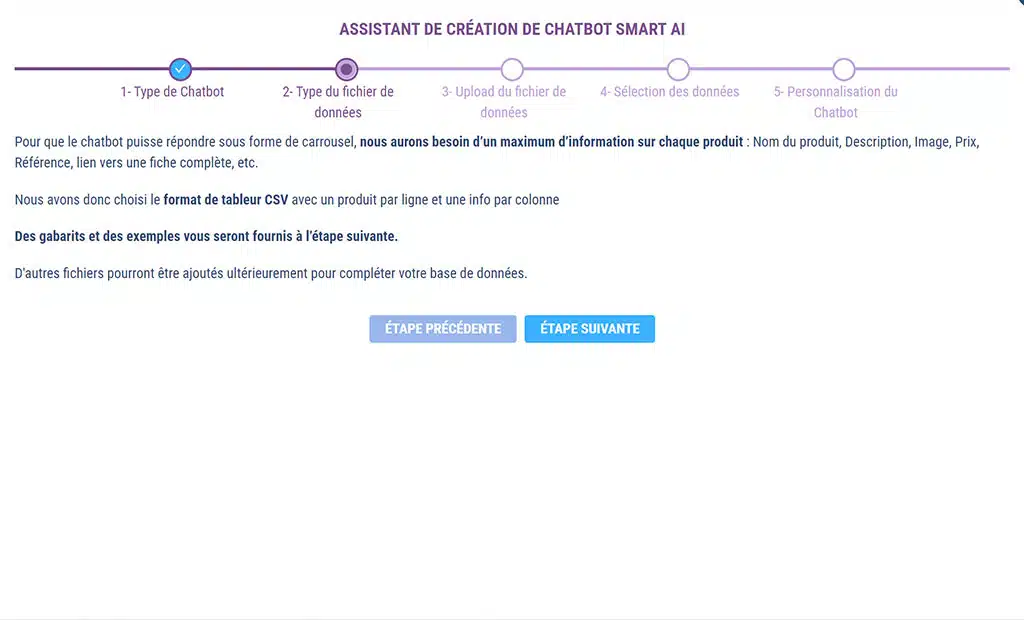
b. Chatbot de recherche de produits
Pour les chatbots Recherche de Produits, nous proposons uniquement le format CSV (format standard des tableurs) pour l’upload des données.
Cliquez sur le bouton « ÉTAPE SUIVANTE »
Il convient de mettre en forme le fichier CSV pour que SMART AI le comprenne.
Nous vous conseillons donc de télécharger notre exemple de fichier CSV et notre gabarit pour vous aider.
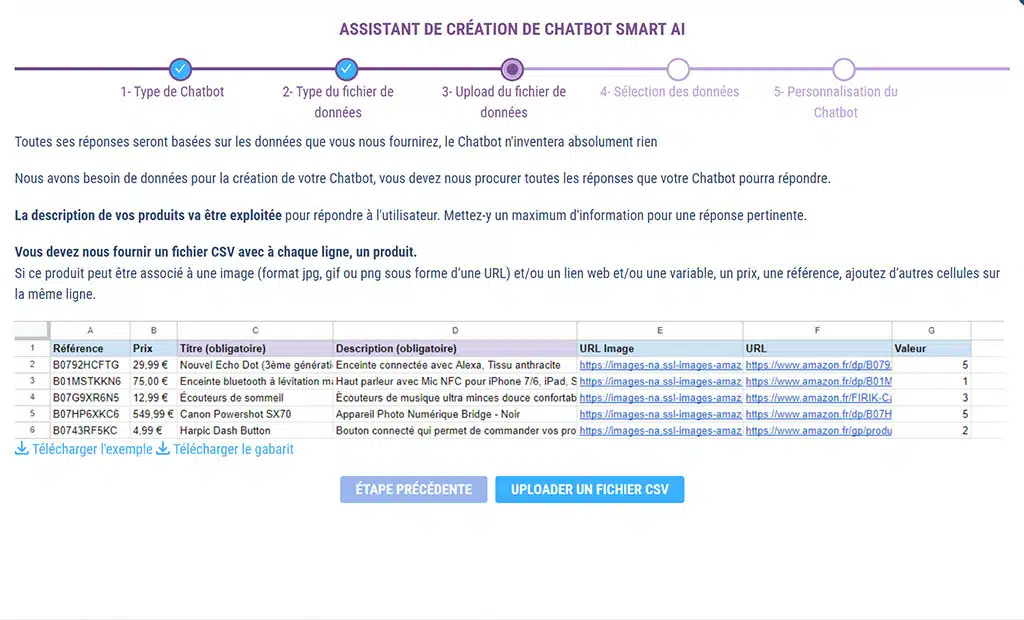
En cliquant sur le bouton « UPLOADER UN FICHIER CSV» vous ouvrirez l’explorateur de fichier de votre ordinateur et vous pourrez y choisir votre fichier.
Le fichier s’ouvrira alors dans l’interface de l’étape suivante.
C’est à cette étape que vous allez faire correspondre les colonnes de votre fichier CSV au type de données que doit traiter SMART AI.
Pour ce faire vous faite votre choix dans le menu déroulant au dessus de chaque colonne.
ATTENTION
N’oubliez pas de vérifier d’indiquer à partir de quelle ligne le traitement doit débuter.
L’assistant vous indiquera automatiquement le nombre de crédits nécessaires au traitement des données.
Cliquez sur « ÉTAPE SUIVANTE » pour valider votre fichier.
c. Chatbot de recherche de documents
Pour les chatbots Recherche de Documents, nous proposons uniquement le format CSV (format standard des tableurs) pour l’upload des données.
Cliquez sur le bouton « ÉTAPE SUIVANTE »
Il convient de mettre en forme le fichier CSV pour que SMART AI le comprenne.
Nous vous conseillons donc de télécharger notre exemple de fichier CSV et notre gabarit pour vous aider.
En cliquant sur le bouton « UPLOADER UN FICHIER CSV» vous ouvrirez l’explorateur de fichier de votre ordinateur et vous pourrez y choisir votre fichier.
Le fichier s’ouvrira alors dans l’interface de l’étape suivante.
C’est à cette étape que vous allez faire correspondre les colonnes de votre fichier CSV au type de données que doit traiter SMART AI.
Pour ce faire vous faite votre choix dans le menu déroulant au dessus de chaque colonne.
ATTENTION
N’oubliez pas de vérifier d’indiquer à partir de quelle ligne le traitement doit débuter.
L’assistant vous indiquera automatiquement le nombre de crédits nécessaires au traitement des données.
Cliquez sur « ÉTAPE SUIVANTE » pour valider votre fichier.
d. Achat de crédits
Si vous n’avez pas ou pas assez de crédits, l’assistant vous proposera d’en acheter.
Cliquez alors sur le bouton « ACHETER DES CRÉDITS« .
Cela ouvrira une fenêtre en surcouche avec nos offres d’achat de crédits.
Les crédits sont nécessaire pour la création du chatbot avec SMART AI, mais aussi pour chaque ajout à la base de donnée ainsi qu’à chaque requête faites par les utilisateurs.
Il convient donc de toujours en avoir une réserve sinon vos utilisateur ne pourront plus faire de recherche grâce à votre chatbot. Mais ne vous inquiétez pas, votre chatbot ne s’arrêtera pas d’un coup, vous serez toujours prévenu par email lorsque votre nombre de crédits sera critique.
C. Personnalisation
A cette étape vous allez pouvoir personnaliser les éléments principaux de votre chatbot :
- Le nom du Chatbot,
- L’avatar du Chatbot (pour les chatbots web),
- Le message d’accueil CAD le premier message que recevra l’utilisateur,
- Le message par défaut CAD le message envoyé par le Chatbot lorsqu’il ne sait pas répondre.
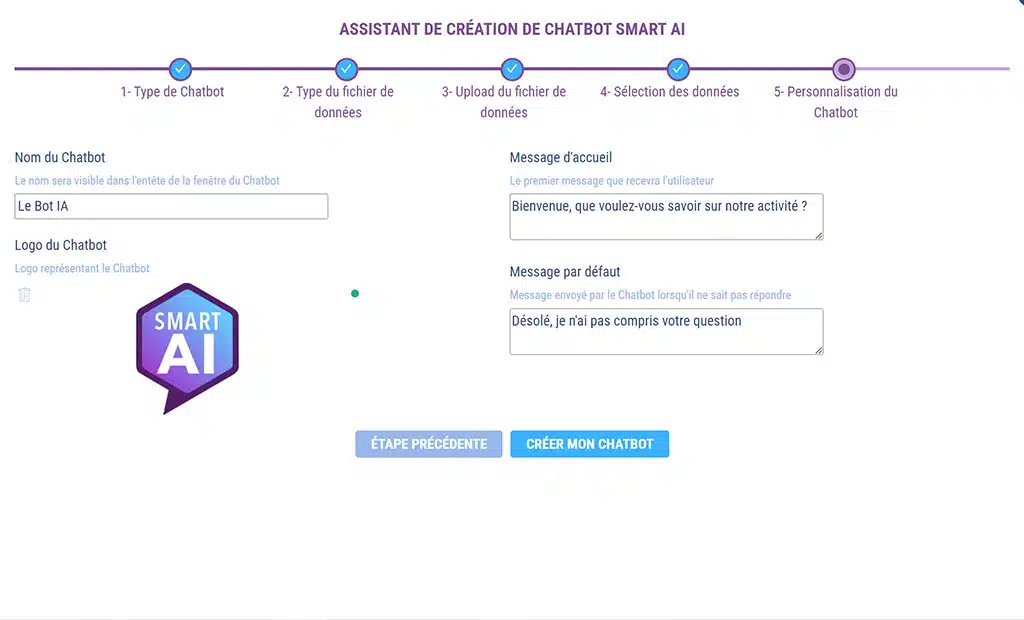
Cliquez enfin sur le bouton « CRÉER MON CHATBOT » pour que la magie de SMART AI opère.
3. Votre chatbot dans l’interface simplifiée
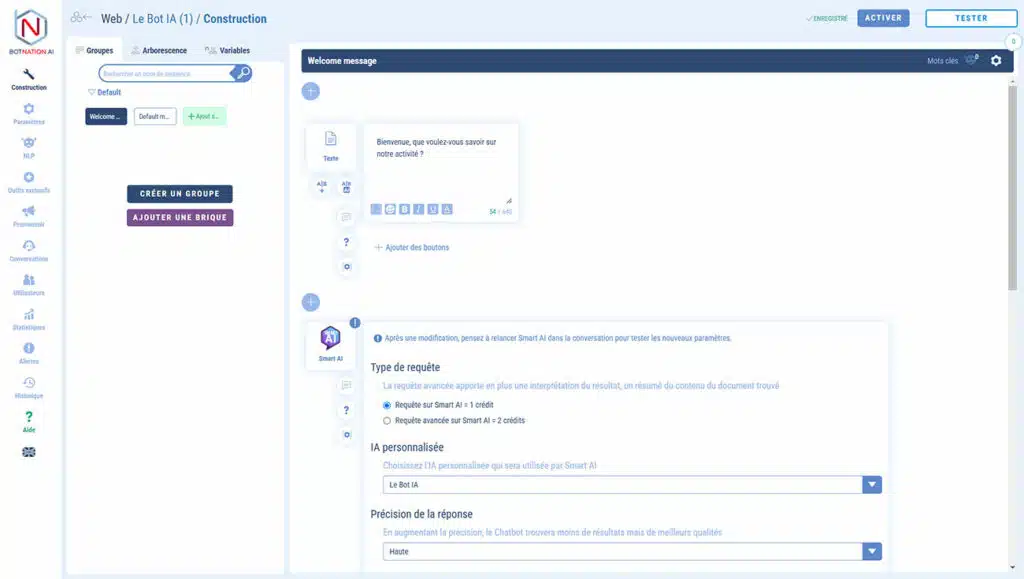
Dans la partie gauche de l’écran, vous avez une navigation verticale. Par défaut vous vous trouvez sur l’écran de Construction.
A. Écran de Construction
Les paramètres suivants sont modifiables :
- Nom du chatbot
- Avatar du chatbot (pour les chatbots web),
- Message d’accueil,
- Type de requête = option de personnalisation de la réponse (en plus d’afficher la réponse correspondante, l’IA personnalise le message). Cette option est désactivée par défaut,
- Précision de la réponse = menu déroulant permettant de modifier ce paramètre (si les réponses du chatbot ne sont pas satisfaisante, c’est ce paramètre qu’il faut changer),
- Onglet de comportement du chatbot lorsqu’il trouve un résultat ou pas.
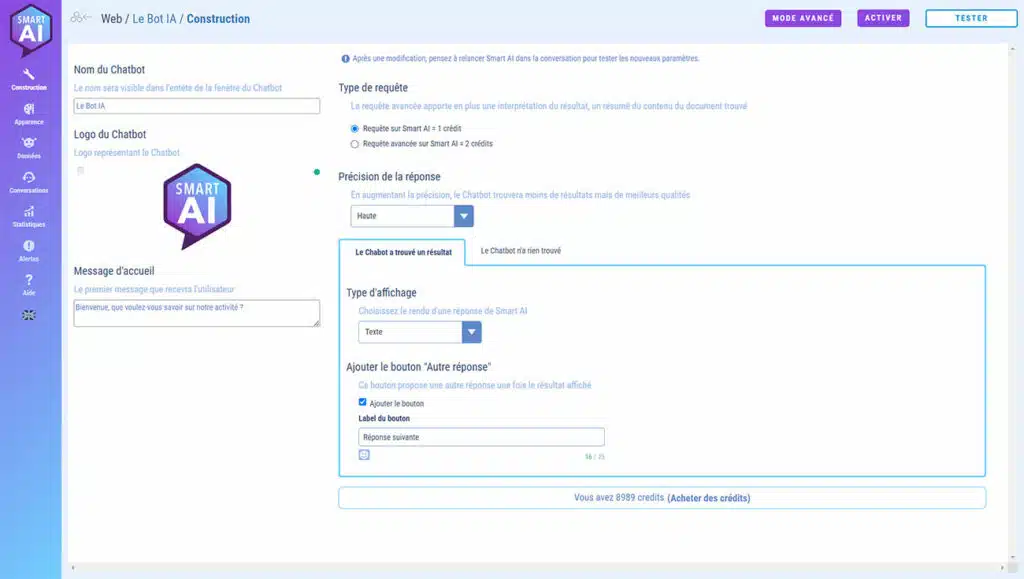
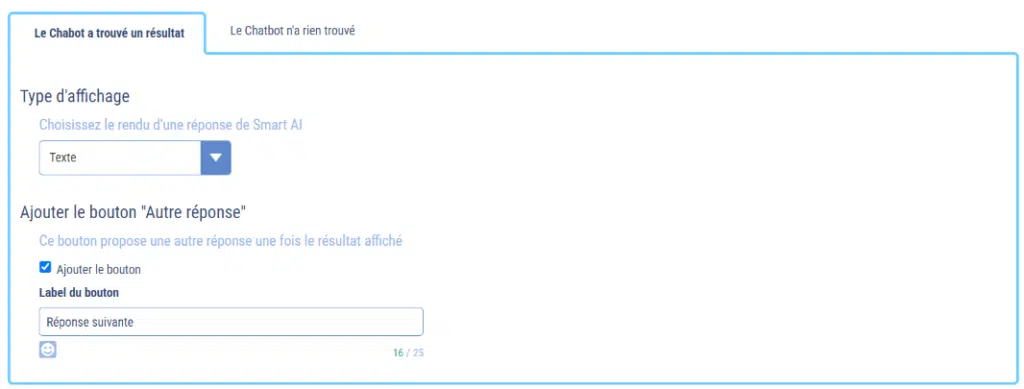
Paramètres de l’onglet de comportement du chatbot « Le chatbot a trouvé un résultat« :
- Type d’affichage = selon le type de chatbot et de données de votre fichier, cela permet de choisir entre une réponse uniquement textuelle, textuelle avec une photo ou sous forme de carrousel,
- Ajouter le bouton « Autre réponse » = offre la possibilité à l’utilisateur d’avoir la prochaine réponse la plus pertinente,
- Label du bouton = permet de donner un nom au bouton correspondant si l’option précédente a été choisie.
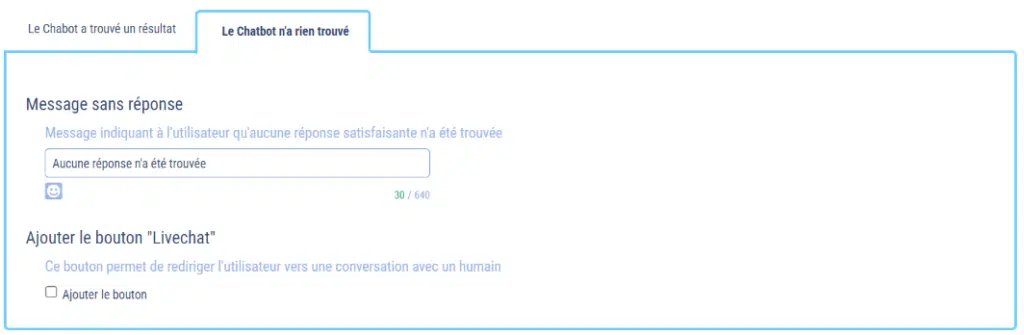
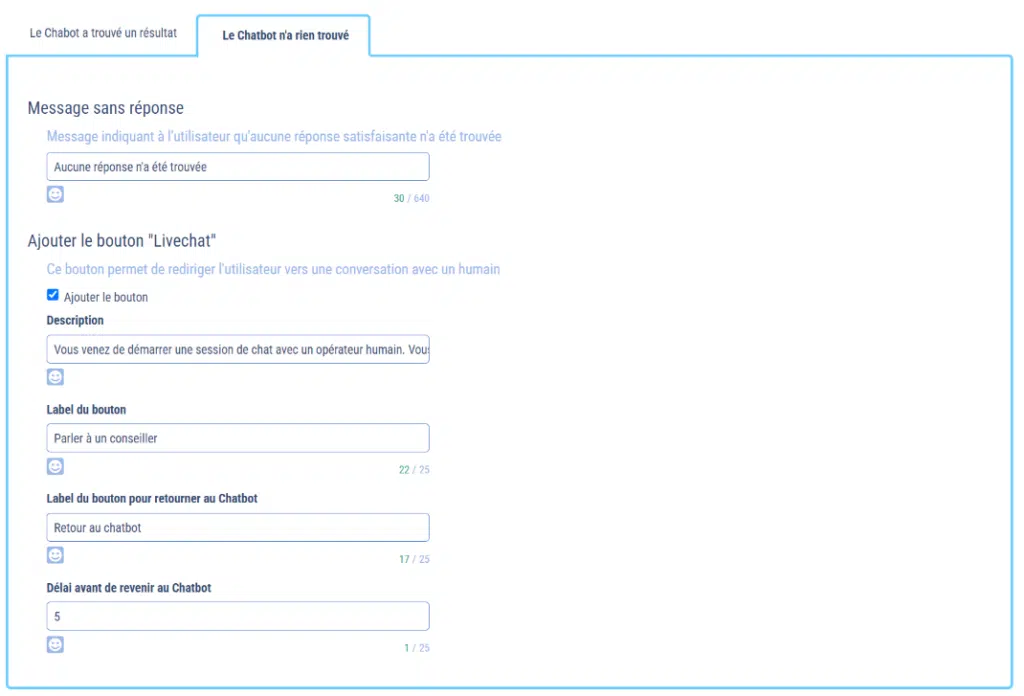
Paramètres de l’onglet de comportement du chatbot « Le chatbot n’a rien trouvé« :
- Message sans réponse = vous retrouvez ici le message que vous aviez saisi à l’étape Personnalisation de l’assistant SMART AI,
- Ajouter le bouton « Livechat » = Ajoute l’option de joindre un conseiller en direct quand le chatbot n’a pas trouvé de réponse adaptée.
Si vous choisissez d’activer le Livechat sur votre chatbot, voici les paramètres s’y rattachant :
- Description = message expliquant à l’utilisateur qu’il quitte le chatbot pour le Livechat,
- Label du bouton = nommage du bouton qui lance le Livechat,
- Label du bouton du retour au Chatbot = nommage du bouton qui quitte le Livechat pour revenir au bot Smart AI,
- Délai avant de revenir au Chatbot = temps en heure à partir duquel le chatbot se relancera tout seul si l’utilisateur ou le conseiller n’a pas fermé le Livechat.
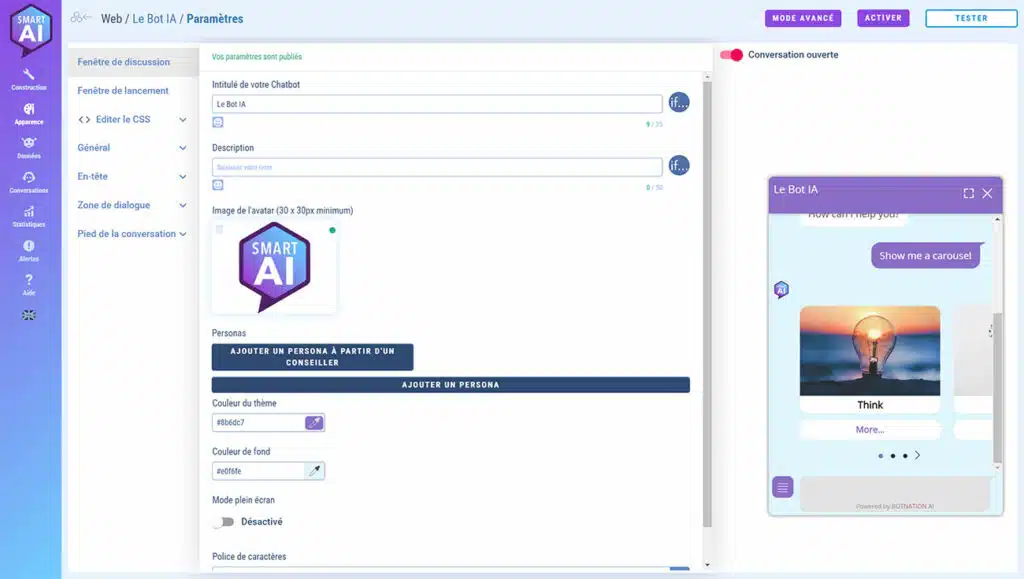
B. Écran Apparence (chatbot-web)
C’est sur cet écran que vous pourrez personnaliser graphiquement votre chatbot web.
De la forme des bulles de dialogue aux couleurs des boutons, de nombreuses options vous permettent de modifier l’apparence du chatbot pour qu’il s’intègre parfaitement à votre site internet.
Pour le détail de chaque paramètre, voir l’article : Comment personnaliser mon chatbot web ?
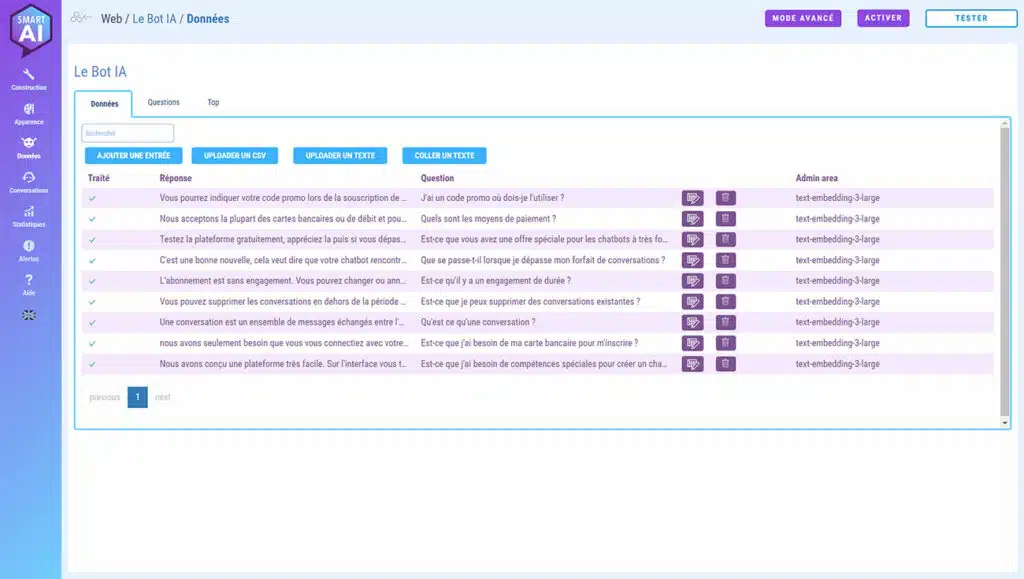
C. Écran Données
C’est ici que vous aller pouvoir gérer votre IA Personnalisée.
Vous avez 3 onglets :
- Données,
- Questions,
- Top.
a. Onglet Données
Actions possibles :
- Modifier les données existantes,
- Ajouter de nouvelles données,
- Supprimer des données
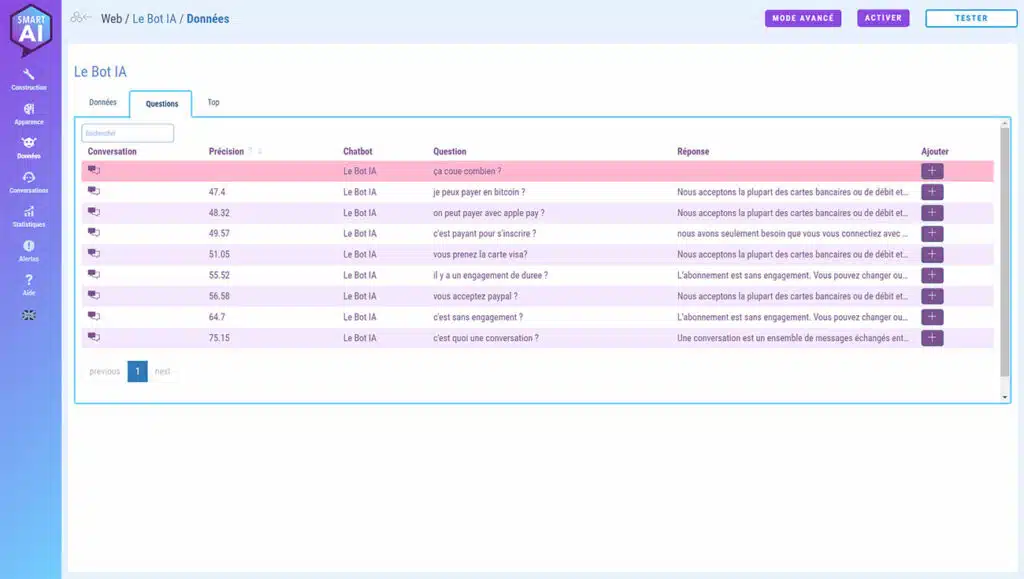
b. Onglet Questions
Vous trouverez ici l’historique d’utilisation de votre IA Personnalisée.
Les questions auxquelles le chatbot n’a pas pu répondre apparaissent ici en rouge. En bout de ligne, il y a un bouton « Ajouter ». C’est pratique pour ajouter de nouvelles réponses à votre IA.
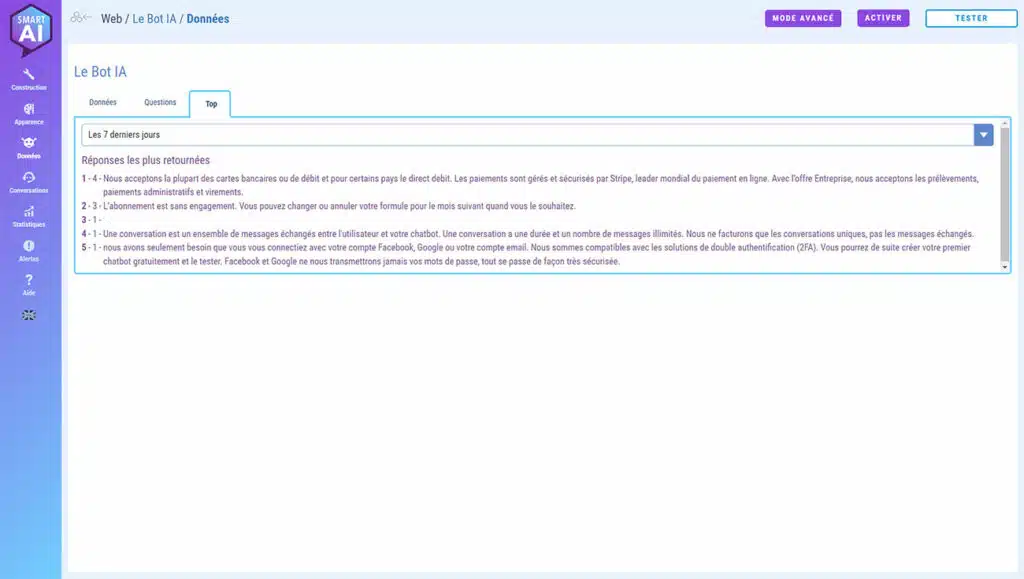
c. Onglet Top
Cet onglet classe les Réponses les plus retournées. Idéal pour comprendre comment vos utilisateurs se servent de votre IA.
D. Écran Conversations
Cet onglet permet de retrouver les conversations entre vos utilisateurs et votre chatbot.
Si le Livechat a été activé, dans un chatbot web, c’est ici que vous pourrez gérer les discussions et vos conseillers.
Pour le détails du fonctionnement du Livechat, voir l’article: Le mode avancé de l’escalade vers l’humain (Chatbot Web)

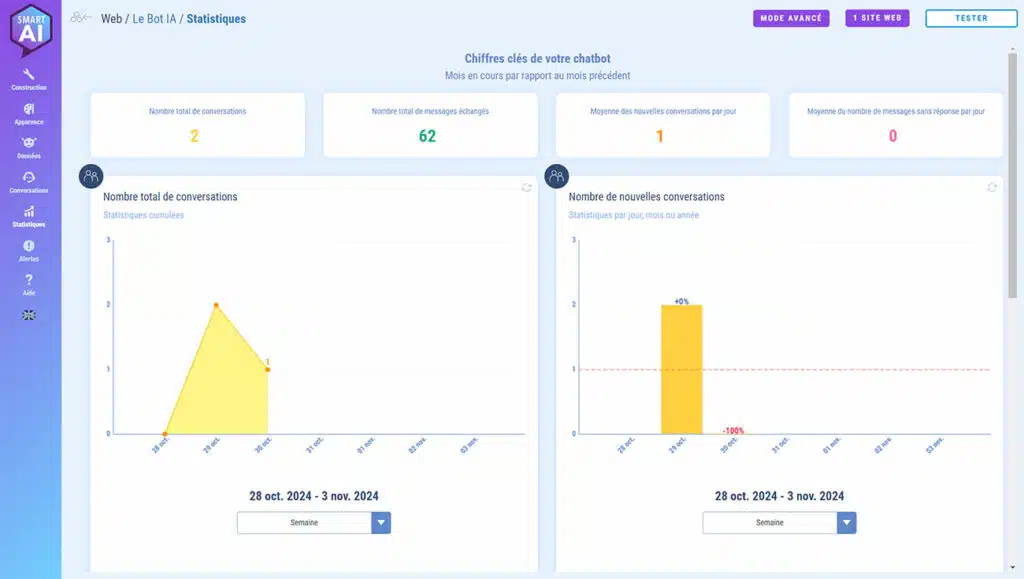
E. Écran Statistiques
Cet écran regroupe les statistiques de votre chatbot au jour le jour : nombre de conversations, nombre de messages échangés, etc.
F. Écran Alertes
C’est ici que vous retrouverez les alertes d’erreur de fonctionnement technique de votre chatbot afin de pouvoir debugger.
Voir l’article : La console d’erreurs : les alertes de vos chatbots.
G. Aide
Besoin d’aide ? C’est ici que ça se passe.
Vous avez différents canaux :
- Articles de l’aide en ligne = plus de 300 articles comme celui-ci qui vous expliquent en détail les fonctionnalités de la plateforme,
- Tutoriels vidéo = des dizaines de vidéos explicatives,
- Quoi de neuf = le détail de toutes les mises à jour de la plateforme depuis sa création,
- Demander à la communauté = page Facebook de la communauté des utilisateurs de Botnation,
- Discuter avec nous = Livechat avec nos experts du lundi au vendredi durant les horaires d’ouverture.
H. Tester son chatbot
Cliquez simplement sur le bouton « Tester » en haut à droite pour ouvrir un nouvel onglet dans votre navigateur avec l’écran de test dans le cas d’un chatbot-web ou un nouvel onglet avec une page de test sur Messenger.
I. Publier son chatbot
Lorsque vous êtes satisfait de vos tests, vous pouvez publier votre chatbot. Pour ce faire, vous devrez souscrire à un d’abonnement.
Nos offres sont adaptées au volume de conversations uniques par mois de votre chatbot : voir nos offres.
Pour publier votre chatbot-web sur votre site, il faut pouvoir ajouter un javascript (créé automatiquement par Botnation) sur les pages sur lesquelles vous voulez que le chatbot apparaisse. Dans le cas d’un site WordPress, Botnation met à votre disposition un plugin dédié.
Articles en relation :
– Comment installer mon chatbot sur mon site web
– Installation et configuration du plugin WordPress Botnation
– Comment ajouter mon chatbot sur mon site Wix ?
Pour publier votre chatbot Messenger, vous devez être administrateur de la page Facebook à laquelle il va être rattaché.
Voir l’article : Publier votre chatbot Facebook Messenger
Et voila, comme promis, en quelques minutes, vous avez un chatbot opérationnel avec une IA personnalisée à partir de vos données grâce à SMART AI de Botnation.
4. Votre chatbot dans l’interface avancée
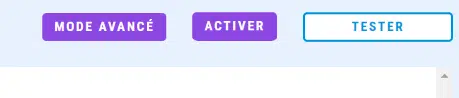
Si vous voulez que votre chatbot ait un comportement plus complexe et avoir accès à toute la puissance de Botnation, il faut activer le Mode Avancé.
Exemples de comportements avancés :
- ne proposer le LiveChat qu’à certains horaires,
- proposer du contenu statique avec une structure en arborescence,
- capturer des infos de vos utilisateurs (nom, prénom, email, etc.),
- sauvegarder les données du chatbot dans un GoogleSheet,
- envoyer des emails,
- se connecter à votre CRM,
- etc.
Pour ce faire, il vous suffit de cliquer sur le bouton « MODE AVANCÉ » en haut à droite.
Cela créera une copie de votre chatbot sur votre tableau de bord avec toutes les fonctionnalités accessibles.
Ci-dessous votre chatbot dans l’interface complète de la plateforme.
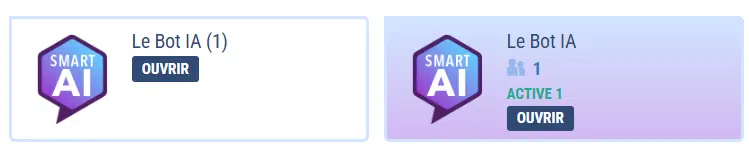
Sur votre tableau de bord, voici comment vos bots apparaîtront :
- à gauche la copie du bot avec l’interface complète,
- à droite le bot d’origine avec l’interface simplifiée.