Discover all the Botnation features dedicated to forms.
On average, a chatbot generates 30% more leads than a traditional form. That’s why, on our platform, we’ve developed various features to make the creation of a chatbot form as simple and ergonomic as possible, and to make the user experience as fluid and pleasant as possible.
We’ll look at all these features below, as well as the steps involved in saving the data captured in a Google Sheet.
1. User input
This feature lets you ask an open-ended question such as “What’s your name?”, “What’s your age?”, “What’s your email?” or “Describe your project in a few lines:” and save the answer in a variable.
Among the construction features, click on “User input”.

This will add the following element to your sequence:

Once you’ve entered the question, the first drop-down menu will ask you to choose the variable in which you wish to save your user’s answer. So create this variable, or choose it if you’ve already created it.
The next drop-down menu concerns the variable type. There are 3 of them:
- Free text entry: the chatbot will record everything the user has written. This is what you choose if you want to capture a name, address or additional information,
- Digits entry: the chatbot will only detect numbers. Choose this option to capture an age or a telephone number.
- E-mail entry: the chatbot keeps only the email in memory. If the user writes “my email is julien@botnation.ai”, the chatbot will only remember “julien@botnation.ai”.
In this example, we’ve asked the question “What is your surname?”, entered “Last name” as the variable name and logically chosen “Free text entry” as the variable type.

Next, the module asks you which sequence you’d like the user to be redirected to after answering.
If you don’t want to make the question compulsory, there’s nothing to stop you adding a cancel button that will allow you to move on to the next question, for example.
Here’s how this translates ergonomically for the user in the chatbot.

2. User input type Quick Replies
This feature allows you to ask a closed question such as “What is your marital status?” or “Do you own your home?” and to propose all possible choices in the form of buttons, and finally to store this choice in a variable.
Add this feature by clicking on the “Quick Replies” icon among the other functions. (See below).

This will add the following element to your sequence:

The feature consists of a question (limited to 640 characters) and a maximum of eleven Quick Replies.
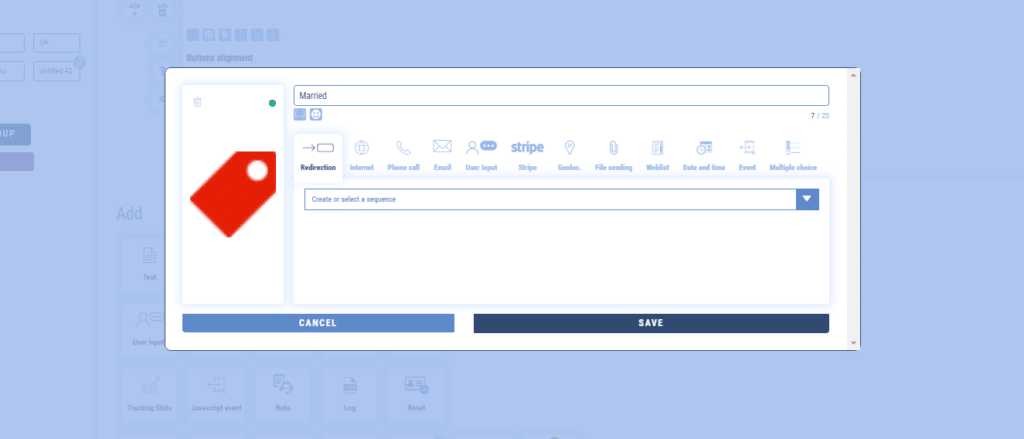
To set up a button, click on “+ Add a Quick Reply”.
You can then name the Reply (25 characters max).
You can also associate a picture with each replie. This appears as an icon at the start of the Replie.

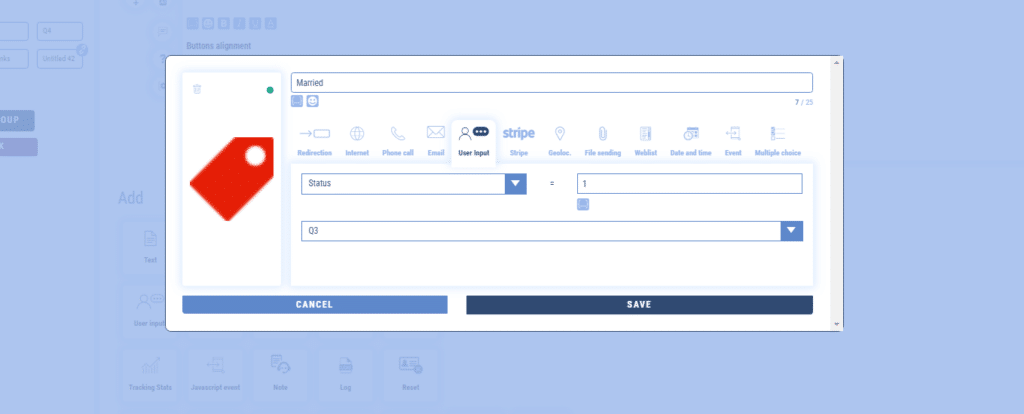
For the type, we’ll take the “User input” option.
The parameters are :
- Name of the variable
- Value of the variable
- Redirection sequence
We can therefore give the button a name that may be different from the value of the variable.

We therefore create different Quick Replies for each choice with the same variable but different values.
In this example, for the question “What is your marital status?”, we will have the following Quick Answers:
- “Married”, which will store the value “1” in the “Status” variable
- “Civil Solidarity Pact”, which will store the value “2” in the “status” variable
- “Cohabitation”, which will store the value “3” in the “status” variable
- “Single” which will store the value “0” in the “status” variable

Here’s how this translates ergonomically for the user in the chatbot.

3. Weblist
Quick Replies are limited to eleven buttons. That’s why Botnation has developed the “Weblist” feature, where this constraint no longer exists.
This can be useful for choosing from many possible answers, such as: a vehicle model, a region, a year of birth, etc…
Among the construction features, click on “Weblist”.

This will add the following element to your sequence:

The parameters for this feature are :
- The question with a maximum of 640 characters,
- The name of the variable in which the choice will be saved,
- How the buttons are displayed to the user,
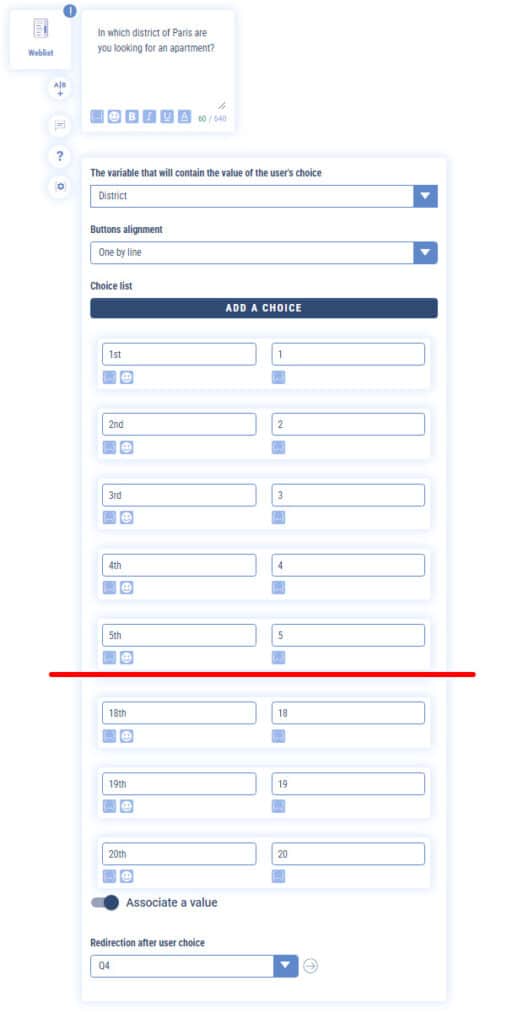
- The list of choices (by default, the variable will take the value of the button name),
- The option to dissociate the button name and the value the variable will take,
- And finally, the redirection sequence after selection.
ATTENTION
We don’t have the option of adding an image/icon to the various choices, as was the case for Quick Replies.
On the other hand, another advantage of the Weblist is that the 25-character limit for the button name no longer exists.
In this example, we’ll ask the user “IIn which district of Paris are you looking for an apartment?” and suggest the twenty districts.
Buttons will be named 1st, 2nd, 3rd, etc., but the value stored in the “District” variable will only be the number.

Here’s how this translates ergonomically for the user in the chatbot.

4. Multiple Choice List
Sometimes, in a form, you need to check several choices for the same question, such as “What language(s) do you speak?” or “Choose vehicle customization options:”.
For this specific case, we have developed the “Multiple Choice List” feature.
Among the construction features, click on “Multiple choice list”.

This will add the following element to your sequence:

You can enter the question that will be displayed above the list of choices, the minimum and maximum number of choices the user will have to make, the name of the validation button and the redirection sequence once the user has validated his choices.
You can add choices made up of two elements:
- The variable that will contain the result. Indeed, each choice will be linked to a variable. If the user selects the choice, the variable linked to this choice will have the value 1, otherwise 0.
- The title of the choice that will be displayed
In this example, we ask “What language(s) do you speak?
For the minimum number of choices ticked, we leave 1 as the person must speak at least English.
For the maximum, we leave the default number.
For the choices we will enter different languages with initials as the variable.

Here’s how this translates ergonomically for the user in the chatbot.

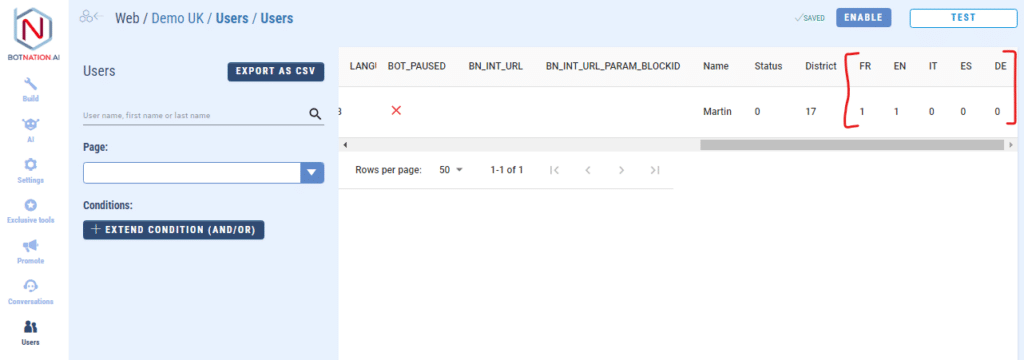
Once the user has clicked on the “Validate” button, the chatbot will update the variables we’ve specified (1 if checked, 0 if unchecked).
You can check this by going to “Users”, sub-section “Users”.

5. Evaluation
The Evaluation feature allows users to give their opinion in the form of a note, such as “How did you find the welcome at our establishment?”, with a rating ranging from 1 “Not satisfactory” to 5 “Very satisfactory”.
Among the construction features, click on “Evaluation”.

This will add the following element to your sequence:

The parameters are as follows:
- The question in 640 characters maximum,
- The name of the variable in which the note will be saved,
- Maximum score,
- The title of the lowest score,
- The title of the highest note,
- The name of the validation button
- The redirection sequence after user selection.

Here’s how this translates ergonomically for the user in the chatbot.

6. Saving data in a Google Sheet
When you create a form chatbot, after asking all your questions using the various dedicated features, before thanking users, you can save the data in a Google Sheet.
We won’t go into detail here. There are several articles in our online help that deal with this very subject.
a. Create the Google Sheet
The first thing to do is to create the Google Sheet.
It must comply with a few rules:
- Your table must contain one and only one header line in the 1st row.
- The first column of your table must never be empty
- Do not use the value undefined in a cell. This keyword is reserved for formulas that do not return a result.
For the form we’ve created in this tutorial, the Google Sheet should look like this.

b. Linking your Google account to the chatbot
Secondly, you need to link your Google account to your Chatbot. This takes place in the “Plugins” tab of your chatbot’s “Settings”.
Click on the “Login with Google” button, then select the account that has access to your Google Sheets file from the page that appears.
Once the permissions are accepted, you are back on your Chatbot and the account you just linked is now selected.

c. Create data backup sequence
Finally, all that remains is to create a sequence in which we will use the “Send datas” feature.
Among the construction features, click on “Google Spreadsheets” and choose “Send datas” from the submenu.

This will add the following element to your sequence:

The parameters are as follows:
- Spreadsheet file: Select the Google Sheets file to be used.
- Sheet: Select the sheet to use
- Force insert new line (option) : If checked, a new line will be created
- Update lines which match with : Select the conditions to identify the line(s) to be updated.
- Insert new line if no line is found (option) : If no row in your table matches the specified conditions, a new row will be created.
- Set data to update: Specify the columns to be updated, matching the columns to the variables captured by the chatbot.
For our example form, this will give :

If you follow all these steps correctly, every time a user completes the form, all the data will be saved and you’ll be able to analyze the results using Google’s powerful spreadsheet tools.

Now you know all about our features dedicated to forms in a web chatbot.
Now it’s your turn.
Plus:
– User input
– Add Quick Replies to your Web Chatbot
– The Weblist (Chatbot Web)
– Multiple choice list (Chatbot Web)
– Ask your Web users for an evaluation
– Importing and exporting Google Sheets data into your chatbot
